The Course
The 18-Hole Championship Golf Course
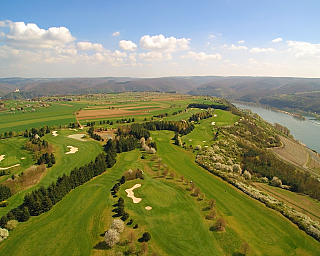
With our 18-hole golf course, which opened in 1994, we are among the most beautiful golf facilities in Germany. Nestled between forests and vineyards, with a unique view of the Marksburg and the Rhine, as well as the heights of Westerwald, Hunsrück, and Taunus, every round of golf becomes an experience.
The fairway bunkers, numerous water hazards, and fast, undulating greens characterise the course: a sporty yet fair challenge. On our driving range, the large putting green, and unique pitching green, you can improve your golf game and train alone or under the guidance of our golf instructors. The course was designed after the model of the famous American golf course architect Robert Trent Jones Jr. and realised by Wolfgang Jarsombek. We see golf as a sporting leisure activity - how about you?
Get to know our golf course with our video tour or check out the design of each hole below!
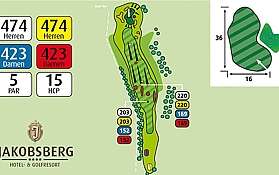
Hole 1 sponsored by Sebamed Marksburg
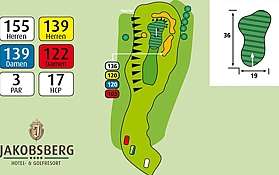
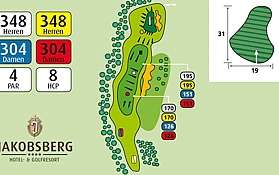
A slight draw over the guiding pole opens up all possibilities for the good player to hit the green with their second shot. However, even less skilled players have the chance to reach the green "in regulation", meaning with their third shot. The out-of-bounds area, which runs to the left of the fairway, is dangerous. For the shot to the green, the player must contend with a downhill lie. The fairway bunkers come into play only from a certain skill level, but one of the two green bunkers to the right or left of the green will be in play. The lower green is not very wide at 19 m, but at 36 m it is quite long, so different pin positions could easily require one or two more or less clubs.
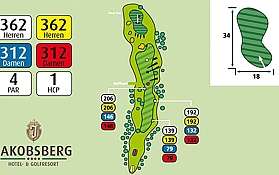
LOCH 2 Apple Avenue
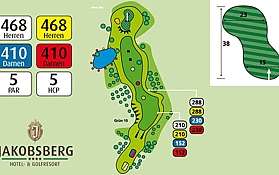
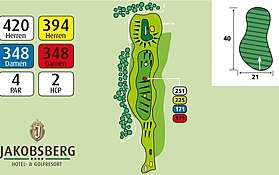
The most difficult hole on the course. The drive must be placed here amidst an apple orchard; otherwise, it is almost impossible to execute a shot to the green. Also, the out-of-bounds runs left of the fairway, but it rarely comes into play because there is a wide strip of rough between the fairway and the boundary. The second shot must be played uphill. Care must be taken to avoid a fairway bunker and two green bunkers. The terraced green allows for variations in pin positions.
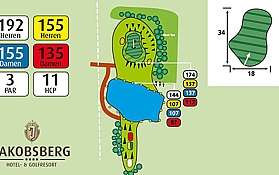
Hole 3 Yellow Waterloo
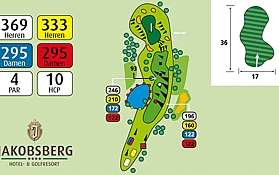
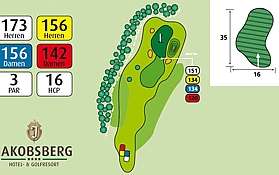
The most difficult Par 3 on the course. It requires the player to make a tee shot with a short wood or a long iron to a fairly narrow, slightly elevated undulating green. From the tee, a ravine with sunflowers and a small lake must be crossed. The approximately 60 m wide ditch poses significant challenges, especially for beginners, and a small green bunker to the right and another to the left of the green can come into play as additional obstacles.
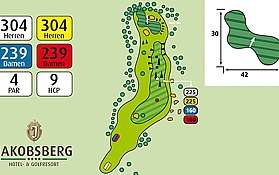
Hole 4 Jako's Corner
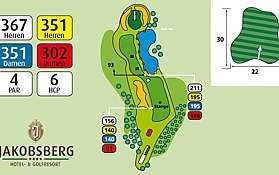
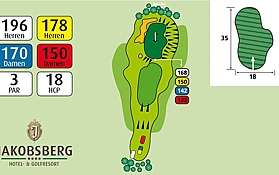
This dogleg to the left requires the player to make a very precise tee shot over the apple tree, which is located in the middle of the fairway. The out-of-bounds area on the left side and the tall trees there make cutting the dogleg a risk. Only the best players will place their tee shot before the green. However, even with a successful standard first shot, the green can be reached without problems with the second shot. If the tee shot is missed, one will inevitably lose a stroke. The green is characterised by its horizontal shape and the associated short landing zone. The out-of-bounds areas to the left and behind, as well as two green bunkers in front and behind, require a precise approach shot, which is usually played with a short iron.
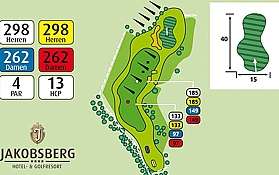
Hole 5 At the Hunting Ground
This dogleg to the right can be significantly shortened with a drive from a good player around the corner. The player must overcome a row of apple trees, a strip of rough, and several bunkers on the right side, and then has only a pitch into the approximately 50 m long green defended by bunkers. For less skilled players, it is advisable to lay up with a medium to long iron on the fairway and then play towards the green with the second or third shot.
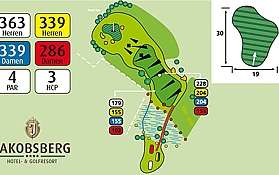
Hole 6 Grand Canyon
One of the most spectacular holes on the course that leaves most beginners pale with respect. It requires crossing a chasm of about 130 m. If they do not make it across the gorge with the first shot, they can make use of the drop zone next to the ladies' tee, from where it only takes about 80 m to cross the gorge. If they then place a shot on the slightly left-sloping fairway, there remains another shot with a mid or long iron to play to one of the most challenging greens on the course. It is very undulating and slopes downwards in all directions, so a one or two-putt can easily turn into more.
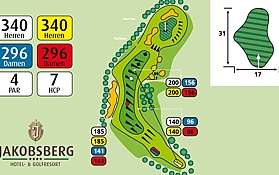
Hole 7 Big Slice
The drive on this rising dogleg to the right is played by good players over a rough lip about 160 m onto the fairway. Less skilled players initially play the tee shot straight onto the fairway, then with two further strokes safely reach the green. The green itself is quite large and has some dangerous undulations, so a one or two-putt is not guaranteed. It is protected by a large bunker on the left and another equally large bunker at the back.
Hole 8 Gone with the Wind
The easiest hole on the front nine. The well-defended green with bunkers is slightly elevated and features a gentle wave in the middle. Depending on the wind direction and flag position, the player can choose between a 7-iron and a wood. One should avoid a small pot bunker on the left side and a large greenside bunker on the right side of the green. A large greenside bunker behind the green rarely comes into play.
Hole 9 Wild Cherry Avenue
If the tee shot succeeds through a small row of trees and the ball is placed on the steeply sloping valley "Long hitters play into the hollow about 200 m away", the player has all options open to prepare the second shot for an attack on the green. In doing so, a row of trees must be played over, which divides the fairway into two halves. If he places his drive in the gaps of the tree rows, he has the opportunity to reach the green with the second shot. This very large green, measuring 40 m, is only protected by a small pot bunker on the left side. However, as it is situated higher, estimating the exact flag position is very difficult, and depending on the flag position, a green wave also comes into play, providing sufficient challenges. A water hazard about 70 m left in front of the green rarely comes into play.
Hole 10 sponsored by DER PART Travel Agency Kerwer Beautiful View
From a high tee, the drive should be placed to the right of a small water hazard. After that, only a mid to short iron is needed to place the ball on the very difficult-to-putt, 41 m long green. A very challenging wave should be factored into the putt depending on the flag position.
Hole 11 Loch Ness Monster
A very spectacular hole. When teeing off, it is important to avoid hitting the ball into the large fairway bunker. If successful, a good player can attack the green with their second shot. In doing so, they must carry a large pond. If they fail to land the ball, there is a risk that it will roll into one of the green bunkers. Less skilled players try to place the ball with their second shot on the fairway to the left of the water hazard, in order to then play onto the green with their third shot. This almost square green also features a large mound on the left side and sloping edges at the back and sides, which can create additional difficulties when putting.

Hole 12 Neverending Story
The longest hole on the course and one of the longest holes in Rhineland-Palatinate. Here, you need to place the tee shot between two small fairway bunkers on the left and a large fairway bunker on the right. On the left side along the fairway, there is an out-of-bounds area. With the second shot, you can confidently go for it again. There are also two fairway bunkers in the landing area here. Good players can now attack the flag with their third shot. The green is excellently protected by bunkers, so it is advisable to carry your shot onto the 33 m long and 16 m wide green.
Hole 13 Hard Rough
The partially quite high rough on the right side of the fairway is the only danger when driving. A medium to long iron to the green opens up all possibilities for the player. However, there are still two bunkers waiting on the left and right before the green, which come into play more often than some would like. When putting, it is important to maintain concentration, as there is the first real danger of being distracted by the stunning view of the great Rhine loop.
Hole 14 The Rhine for the First Time
This hole is characterised by its very long, kidney-shaped green measuring 40 m. The entrance is only about 10 m wide and is protected by two green bunkers. If the tee shot with a mid to long iron does not land on the green, it can become quite problematic for the player, as the areas surrounding the green are quite hilly and slope down towards the out of bounds. If the ball is in the bunker, one should consider themselves lucky that nothing more unpleasant has occurred.
Hole 15 Mission Impossible
An absolute monster hole. The longest par 4 on the course. You really need to hit two massive shots to reach the green "in regulation". The fairway is relatively wide and slopes slightly upwards towards the green. The fairway hangs very steeply to the left towards the out of bounds, while a wide strip of rough lurks on the right. Additionally, you often have to contend with strong winds coming from the Rhine Valley here. An extra challenge comes into play when the pin is located at the back of the green, as there is an additional rise to overcome.
Hole 16 The Rhine View
The easiest hole on the course. Before tackling it, take a moment to enjoy one of the most beautiful views of the Rhine Valley. A fairly wide green allows the player to approach the flag well with a medium to long iron from the elevated tee. The green is protected by bunkers on the left and back sides.
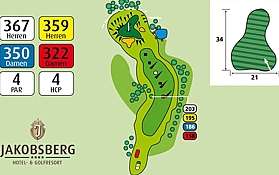
Hole 17 Three Terraces
The second hardest hole on the course. Long hitters can cut the dogleg to the left. To avoid the relatively high risk of losing a ball, one can also keep the ball on the fairway and then attack this unique green with a mid to long iron. It is the pinnacle of German golf course design. Furthermore, it is shaped like a cloverleaf and spans three tiers. It is not exactly a pleasure when the flag is on a different level than where the ball lies. But that's not all: The green is well protected by two strategically placed bunkers, making the entrance very narrow and only a few metres wide. A water hazard to the right in front of the green rarely comes into play.
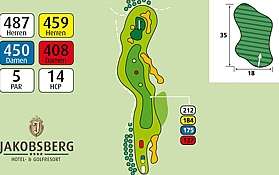
Hole 18 Fairway to Heaven
At this tee, only a boundary awaits on the left for wayward drives. The slope in the middle of the fairway and the blind green make it very difficult to hit the green with the second shot, thus creating an eagle opportunity. Typically, a huge bunker, about 50 m long, awaits for the second shot, separating the 18th fairway from hole 1. A good pitch onto the green gives the player a realistic birdie chance. A bunker in front left, another behind it on the left, and a large one on the right that extends behind the green, along with the boundary behind the green, penalise inaccuracies on the approach.
